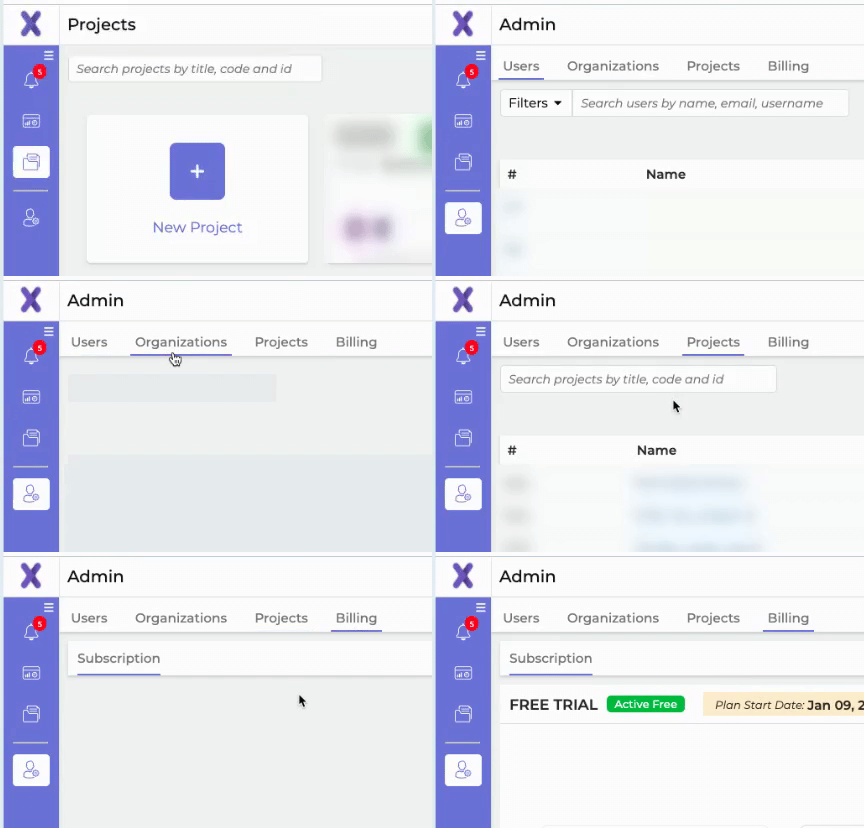
If you have Admin privileges, setting up your team and organizations will be done in the Admin module. This can be found as the Admin icon in the main vertical menu on the left side of your screen.
Admin Help Highlights
Users with admin rights in their organization may do the following:
- Users
- Add a new user
- Edit user info (email and organization)
- Activate users
- Deactivate users
- Resend activation links
- Organizations
- Add new organizations
- View organization info
- Edit organization info
- Delete organizations
- Organization's Projects
- View all organization's projects
- Add new projects
- Add members to projects
- Remove members from projects
- Edit permissions for members
- Add organizations to projects
- Remove organizations from projects
Admins will have four tabs available to build and manage your team and projects, and manage your Xebrio account.
- Users - View and add users, activate and deactivate users, and edit select user info
- Organizations - View organizations, add organizations, delete organizations, and edit info
- Projects - View organization's projects (even those for which you are not a member), add projects
- Billing - View and manage your subscription status, payments, invoices and invoice recipients
Users Tab
Add a New User
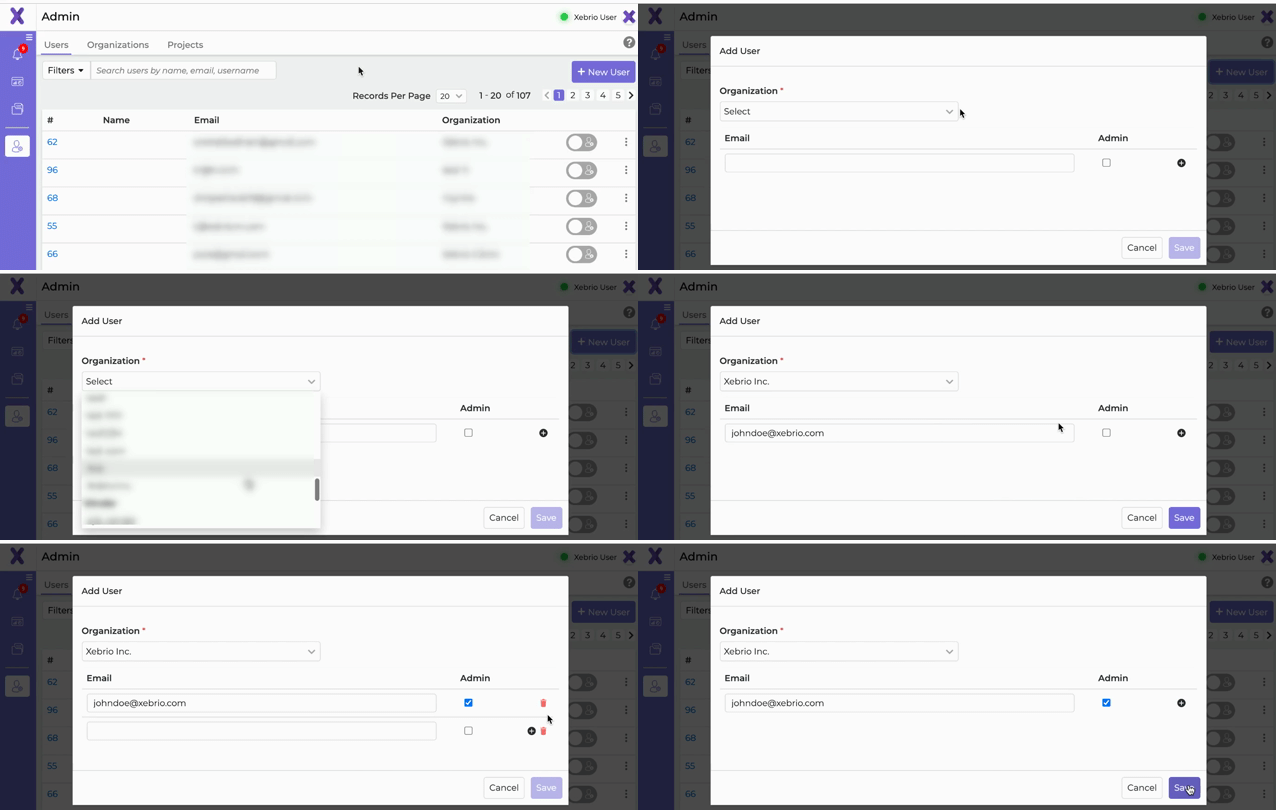
Click on the New User button when in the Users tab of the Admin module. A pop-up will appear for the new user information to be entered.
- Organization: Associate the user to their organization. This drop down will have both Internal, Client and Vendor organizations listed. An organization must be created first for it to be included in the drop down menu. See below section Organizations Tab for for more information.
- Email Address: An email address is required for the new user. An activation email will be sent to this provided email address.
- Admin Check Box: If adding users from internal organizations you may grant a user admin privileges by checking the Admin box. Client and Vendor users may not have admin privileges, and will not have this check box available. See Admin privileges / Admin access.
Activate / Deactivate a User
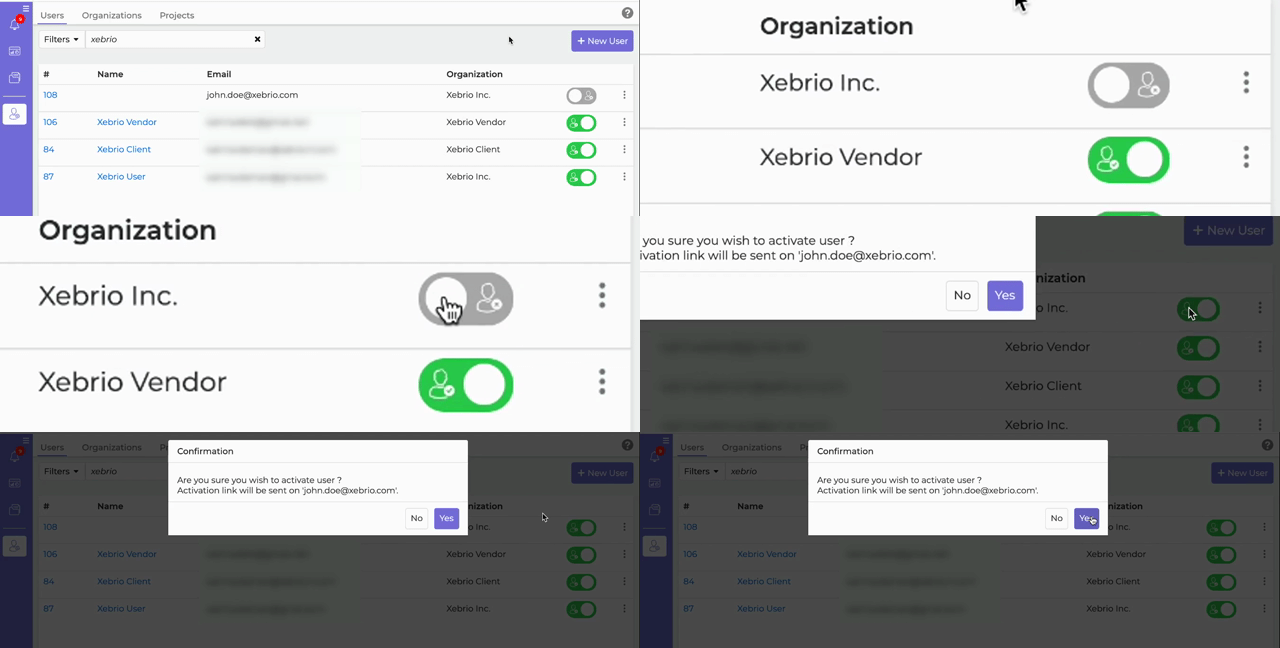
The list of users is found in the Users tab of the admin module. Each user's activation status is shown in their row, designated with an activation toggle as either deactivated ![]() or activated
or activated ![]() . A deactivated user will not be able to log into Xebrio.
. A deactivated user will not be able to log into Xebrio.

To activate a user, click on their activation toggle to switch their status. When toggling to activate a user, the system will ask to confirm activation and send an activation link to the user's provided email address. They will need to follow the steps in the activation email in order to complete the activation process and begin using Xebrio.
To send an activation link directly to a user, click the menu iconon the right of the user's row and select
Copy Activation Link. This will copy the link to your clipboard for you to send to the user in the most appropriate method.

When a user is deactivated, they will be automatically logged out of the system and removed from projects for which they were members. If the user is the only project owner of a project, another project owner will need to be assigned prior to deactivation.
To reactivate, see Reactivating a deactivated user.
Edit User Info
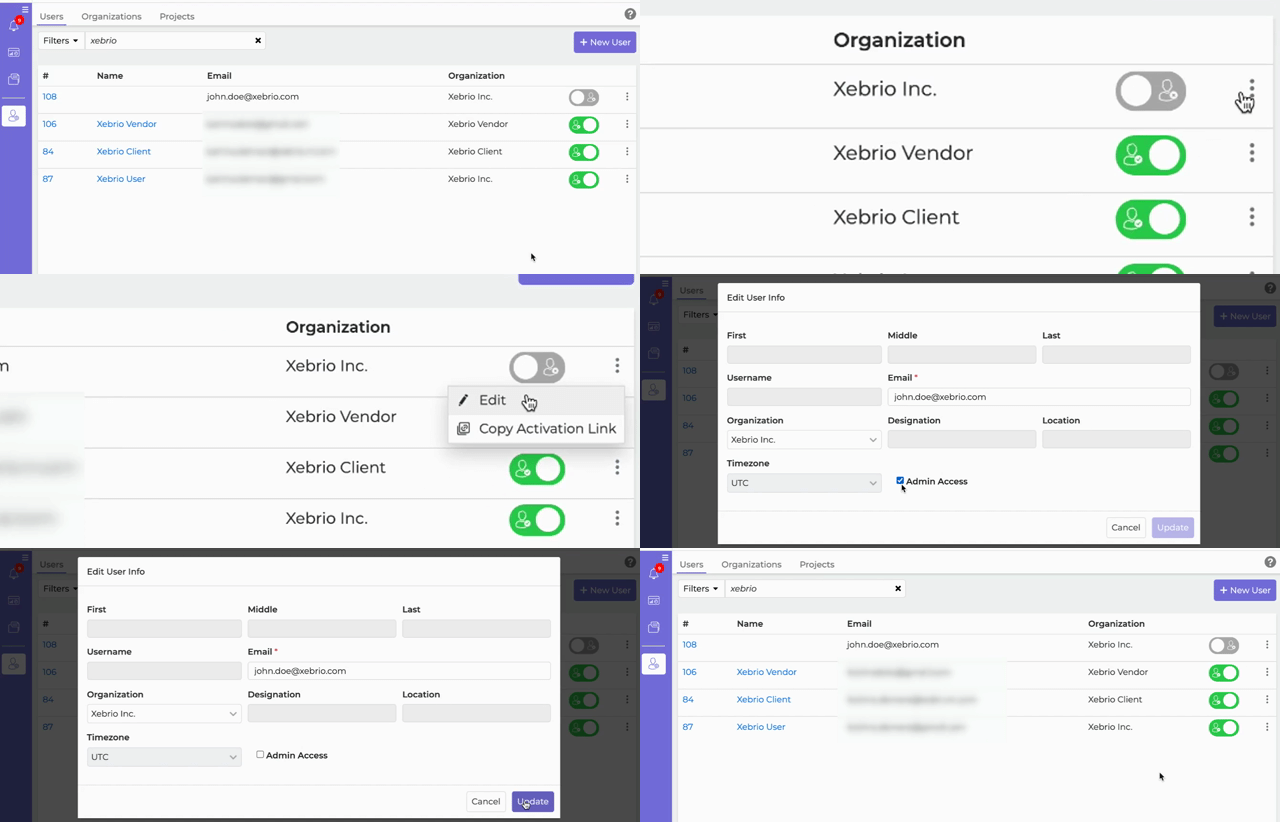
In the list of users, click the menu iconon the right of the user's row and select
Edit. A user's email and organization may be edited by an Admin at any time. A user from an internal organization may be granted Admin Access by checking the Admin box.
If there is no name in the Name column, the user has not added one yet.
Organizations Tab
View Organization info
In the Organizations tab of your Admin module, click on the name of the desired organization to view its info. You will be able to view the organization name, type, primary contact email, and timezone.
Add an Organization
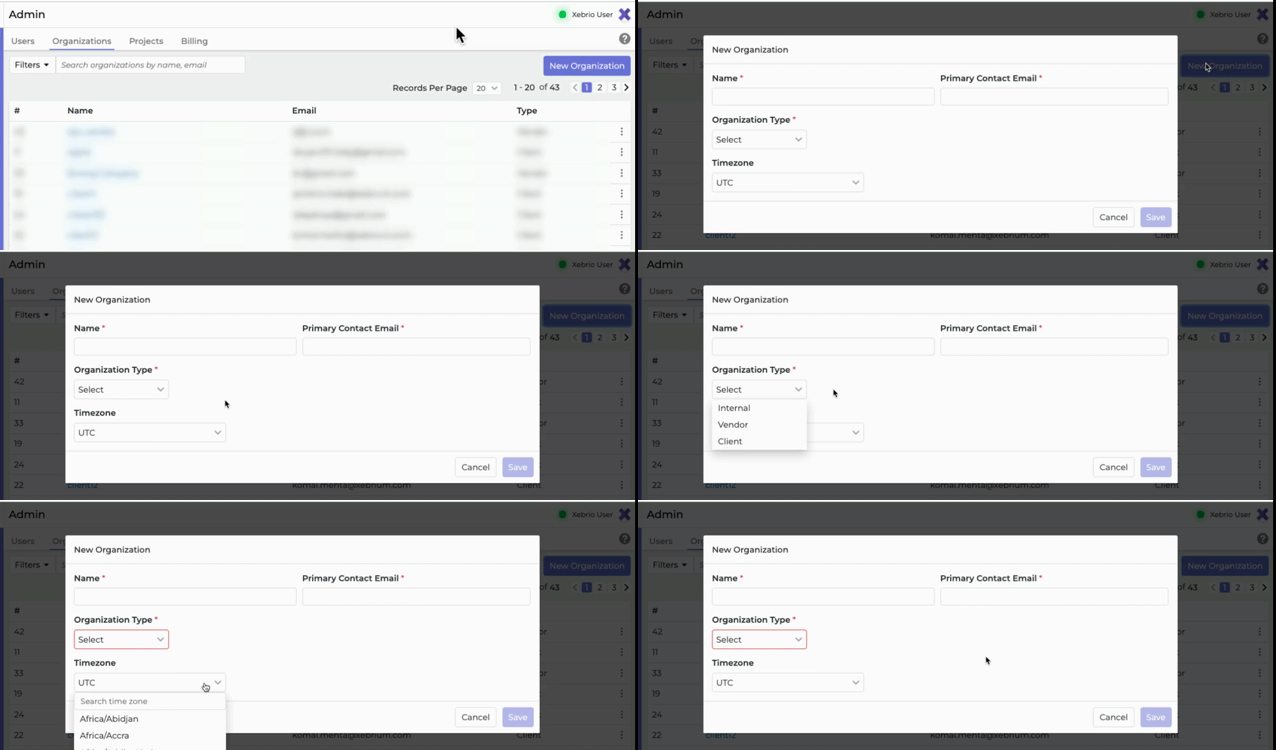
To add an organization click on the New Organization button in the Organizations tab of your Admin module. You will need to input the following items to submit add an organization to the list:
-
-
- Organization name
- Primary Contact Email
- Organization Type
- Internal - This is the group of people belonging to your organization, that you will work with regularly.
- Client - This is the group of people to whom you want to deliver your project. Create a client company to enable external stakeholders to collaborate and monitor the progress you're making on the project.
- Vendor - This group provides goods & services, and are typically provided access to various parts of the project so they can perform their job.
- Timezone (optional)
-
Delete an Organization
In the list of Organizations, click on the menu icon on the desired organizations row and select
Delete. Select Yes to confirm the deletion.
In order to delete an organization, there should not be a user (active or inactive) associated with the organization. The organization should also not be associated with any project (open, closed, overdue, deleted, archived).
There should also be at least one default internal organization present in the Organizations list.

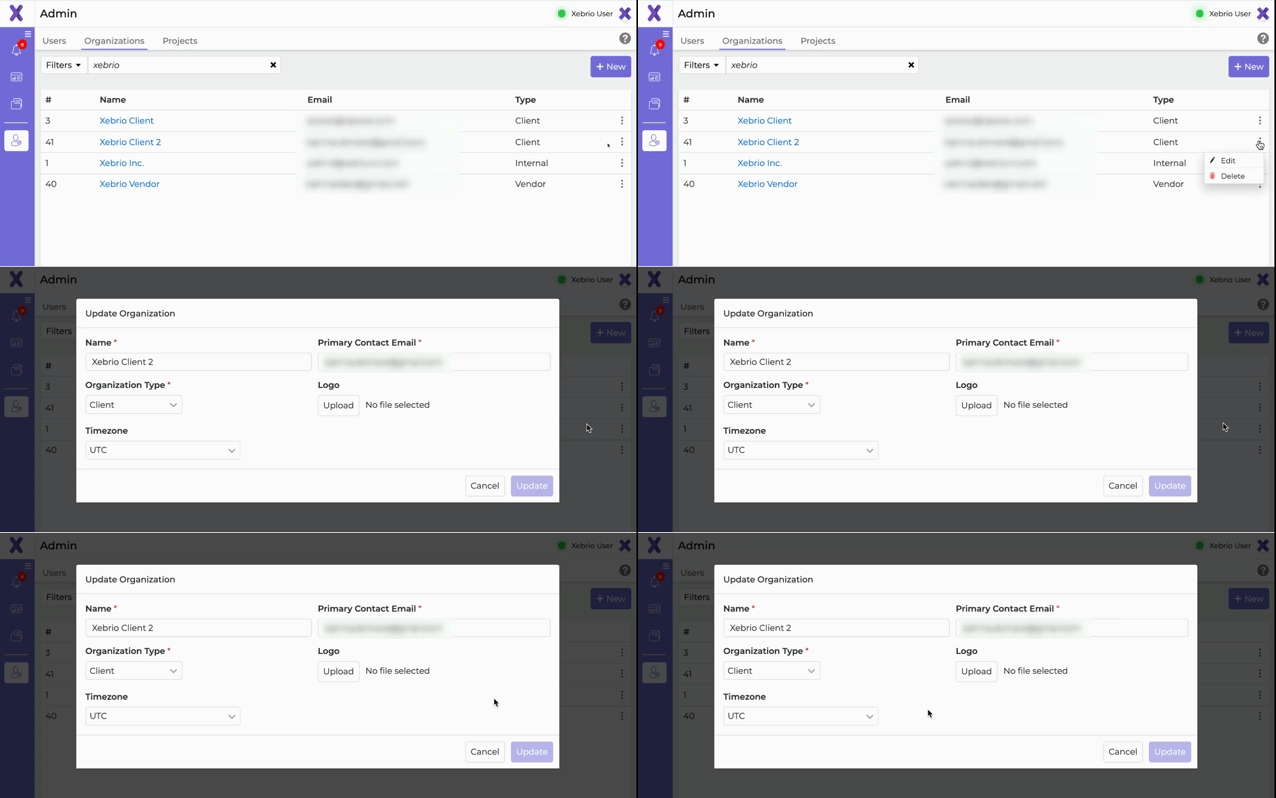
Edit Organization Info
In the list of Organizations, click on the on the desired organizations to select
Edit. You may any or all the text field items, then click Update to submit changes.
Projects Tab
You will be able to view a list of all the projects as well as a dd new projects.

As an admin, you may click any project and perform the following:
-
- Add members to projects
- Remove members from projects
- Edit permissions for members (as long as they are not project members)
- Update a project member's role
- Add organizations to projects
- Remove organizations from projects
Comments
Please sign in to leave a comment.