PERMISSIONS: Users will need permissions to the Test Coverage module to utilize the features in this article. Depending on the settings of a user's project permissions, they may be able to see all test cases and project members, or subsets of both. The content a user can view and edit may vary between project members. Project owners manage the permissions of project members.
Overview
A test case is intended to test a specific behavior of the product and is typically defined for a product, based on the definition or specification of the product behavior (which we formally call requirements). A test case is therefore comprised of one or more actions and the expected result for each action. Together, the actions and their results confirm the behavior of the product as intended. Each pair of an action and its expected result is what we call a test case step. Therefore, a test case is comprised of one or more test case steps. It is not necessary for a test case to have multiple steps. It depends totally on what the test case is intended to test. Test cases may also have preconditions, which are necessary conditions that need to be set up or met before a test case can be executed. These can be specified in the definition of a test case.
When the steps of a test case are tried on a product, which means running the test case on the product, it is called an execution of that test case. A test case can only be executed if the test case status is in Final status.
A test case status is either Draft or Final, and there can be one or more test case versions.
Standalone Test Cases
Test cases that are not based on product specification are called standalone test cases. Test cases can also be defined independent of any product specification, such as when certain aspects of the product behavior are obvious or are common user experience scenarios that do not need to be included in the product specification.
Standalone test cases can be organized into groups, called test suites. Test suites make it easy to include related standalone test cases in testing activities.
Navigating the Test Case Screen
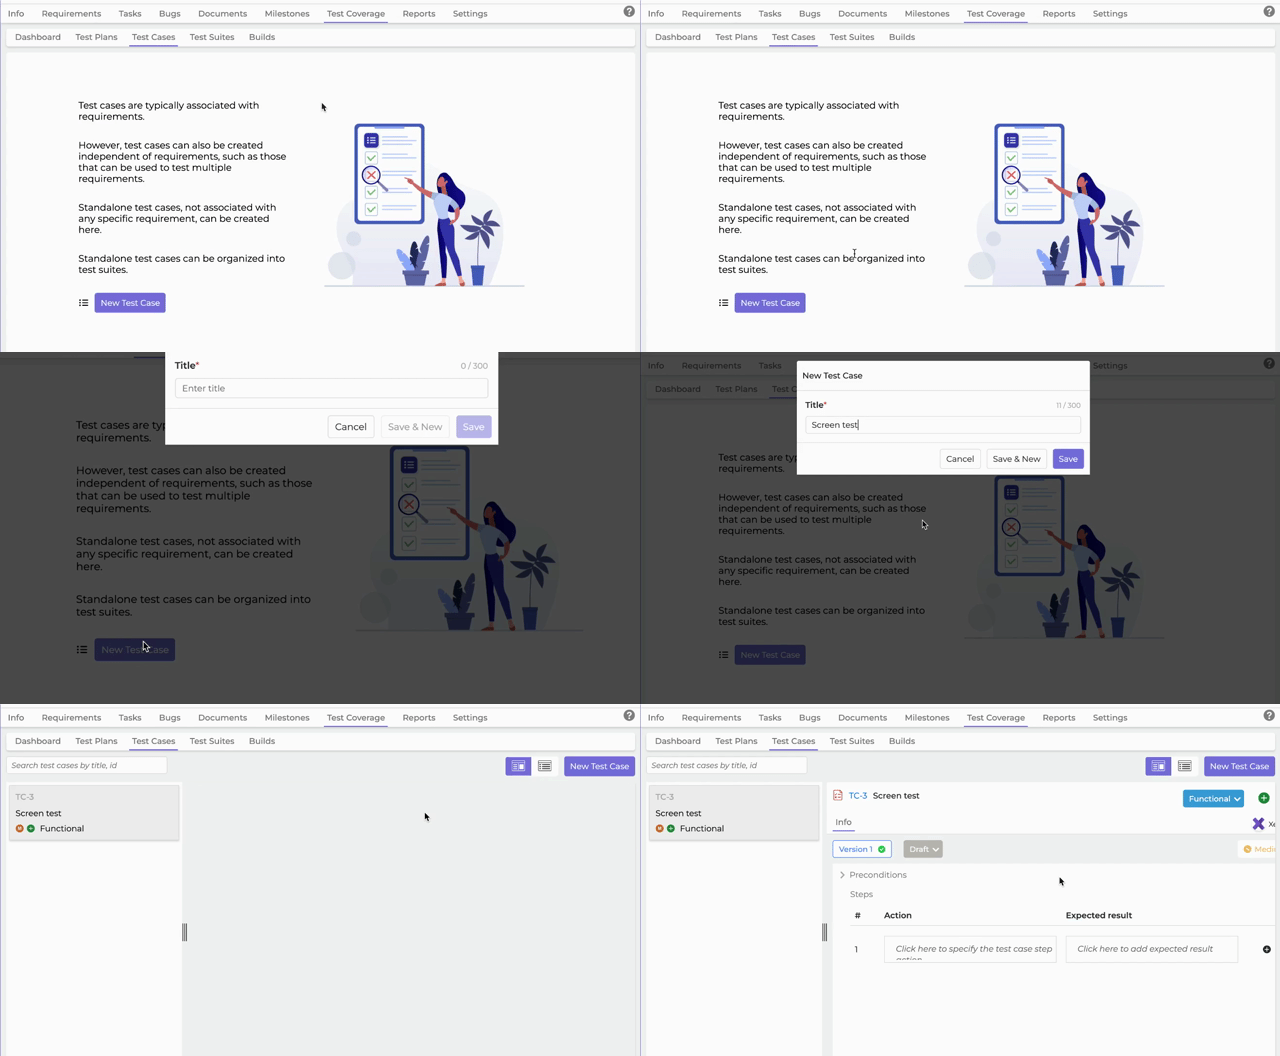
If this is the project's first test case, you will see an intro screen from where you can create a new test case. Click the New Test Case button to start. Add a title for the test case and press return/enter or click on the Save button.
The below image shows the components of a test case details window.
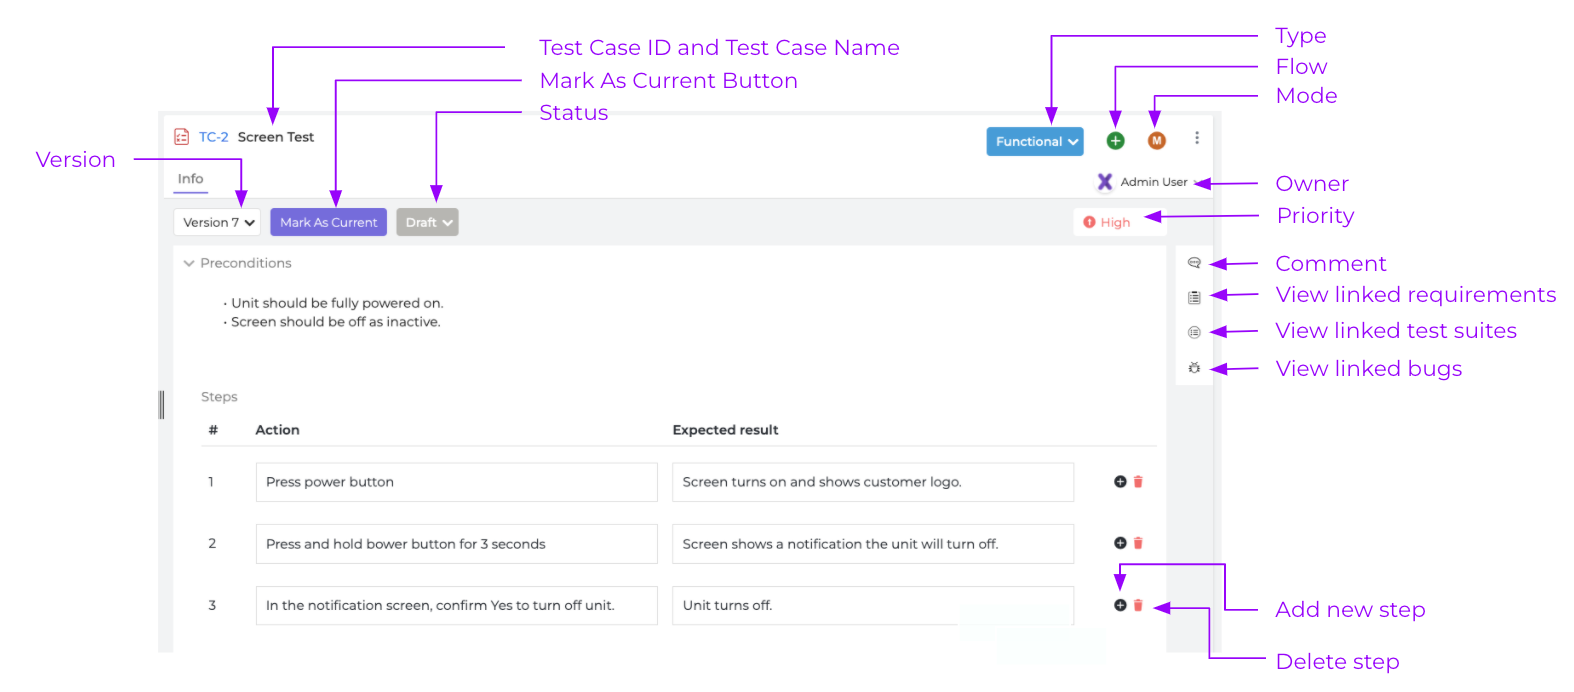
- Test Case ID - Generated by Xebrio in order of creation. This is not editable.
- Test Case Name/Title - Editable at any time. Hover the mouse over the test case title and click the edit
button when it appears. Edit the title and click
to save, or click
or outside the title edit area to cancel editing.
![]()
- Type - Designates the type of test case from a pre-set list. To change the type, click the
on the blue dropdown button to the far right of the test case title. Select the desired type from the expanded dropdown list to update the test case type, see below.

- Flow - Designates whether the test case uses a positive or negative flow. Positive test case flow uses correct and valid inputs to prove the product functions as required and meets specifications. Negative test case flow uses incorrect or unexpected inputs to exercise the stability and robustness of the product. In the test case details window, click the flow button on the right of the title row. Select the desired value from the dropdown.

- Mode - Designate whether a test case is automatic or manual. Click the mode button on the far right of the title row. Select the desired value from the dropdown.

- Status - Indicates the status of the test case version displayed. A test case status can only be edited if the status is Draft. In the test case details window, click the Draft status dropdown to select Final.

- Version - When a test case is created, it has a version number of 1. When a new version is derived, the version number is incremented by 1. To modify a test case after it is in Final status, a new version of that test case must be derived. A new version can be derived from the latest version of a test case only when the latest version has a Final status. To do this, click
located next to the version status.

- Mark As Current - Each test case has one version that is designated as the "current" version. The "current" version of a test case is automatically picked as the version to use when including in test suites or test sessions, for example. The "current" version of a test case is typically the most recent version, but it can be an earlier version also. When a test case has evolved with multiple versions, any version can be designated as the "current" version.
The version marked as the current version will be indicated by a green icon in the dropdown list. All other versions will have a Mark As Current button. Click to mark desired version as current. Test cases that only have one version will not have this button available.

- Owner - Indicates the current owner of the test case. The owner can be any project member, and can be different between test case versions. To change the owner, click the owner button on right of the window. Select the desired member from the dropdown. Users added to the project will appear in the dropdown.

- Priority - Indicates the priority level of the test case, with choices being
High,
Medium, or
Low. To change, click the priority button located below the test case owner avatar. Select the desired priority from the dropdown. Note that priority may differ between test case versions. The test case priority can only be edited if the version is in Draft status.

- Comment - To post or view comments made to a test case version, click
on the right side vertical menu. Add, view, reply to comments in the text area and click Post Comment. Comments posted are specific to the test case version where the comment is made.

-
- Precondition - At times, it is necessary for certain conditions to be set up or met before a test case can be executed. These are called preconditions, and they can also be specified in the definition of a test case.
Preconditions can only be edited for test cases in Draft mode. In the test case details window, click the arrow
to expand and view the preconditions text area. Click in the text area to begin editing, which is in real time and autosaved. Click
to exit edit mode.
- Precondition - At times, it is necessary for certain conditions to be set up or met before a test case can be executed. These are called preconditions, and they can also be specified in the definition of a test case.

- Steps - Each test case step has an action and an expected result. A test case execution is said to be successful (passed) when all steps of the test case show expected results. A test case execution is said to be unsuccessful (failed) when at least one of the steps does not show the expected result.
To edit each step, click in the desired Action or Expected results column text area to begin editing. Click to exit edit mode. Edits are real time collaborative and autosaved.
To add additional steps, click located to the right of the expected results column to add a step below. This button is available at each step for test cases in Draft status.
To delete steps, click located to the right of the expected results column to delete the desired step. The option to delete is available from Step 2 onward for test cases in Draft status.

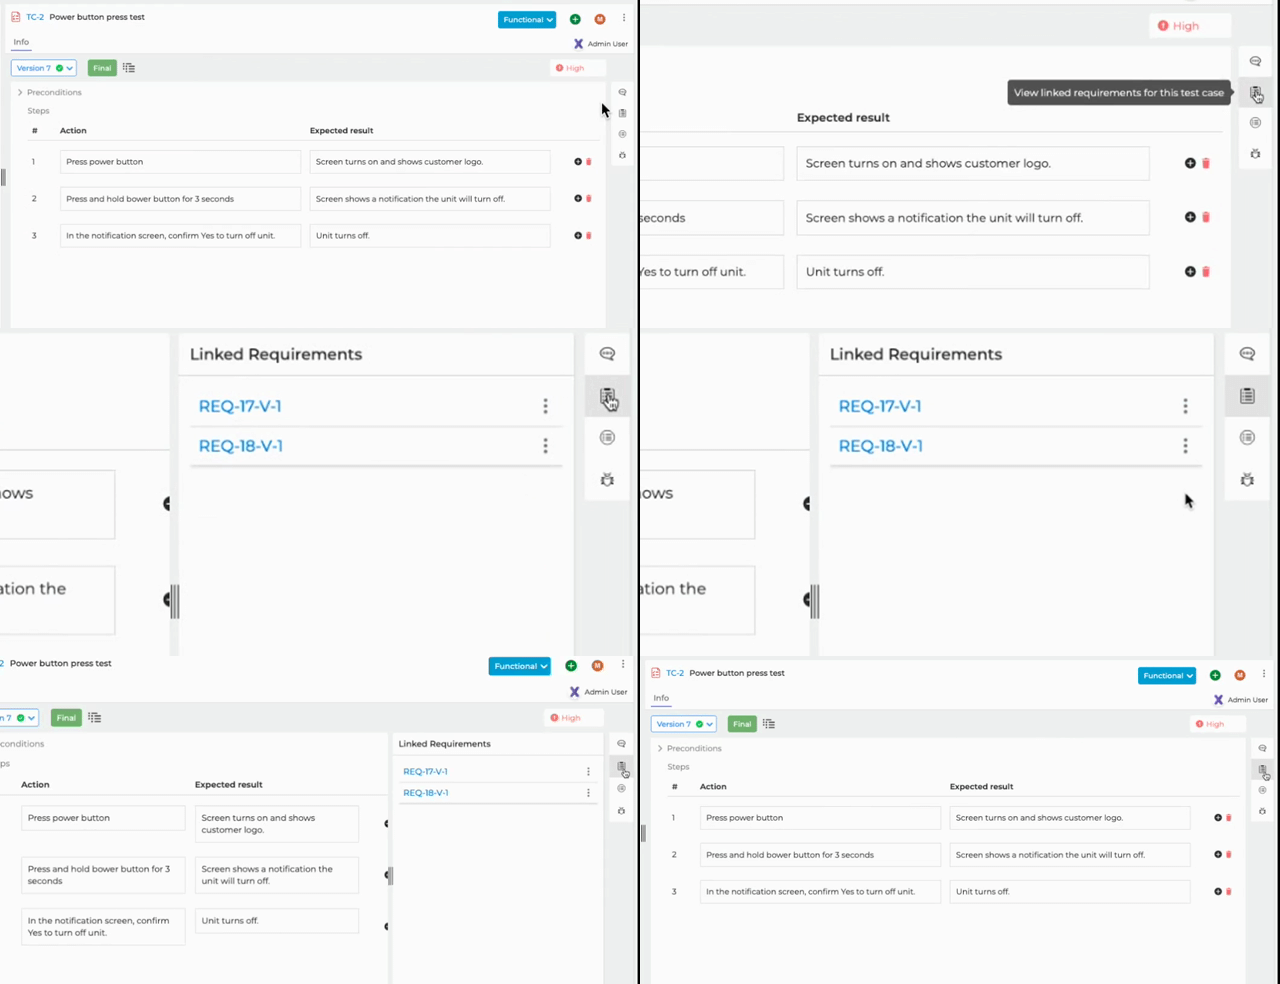
- View linked requirements - To view requirements linked to a test case version, click on the
 icon on the vertical menu on the left side. It will expand to show the list of requirements, if any are linked. Note that linking of requirements to a test case version can be done in the project's Requirements tab under the desired requirement.
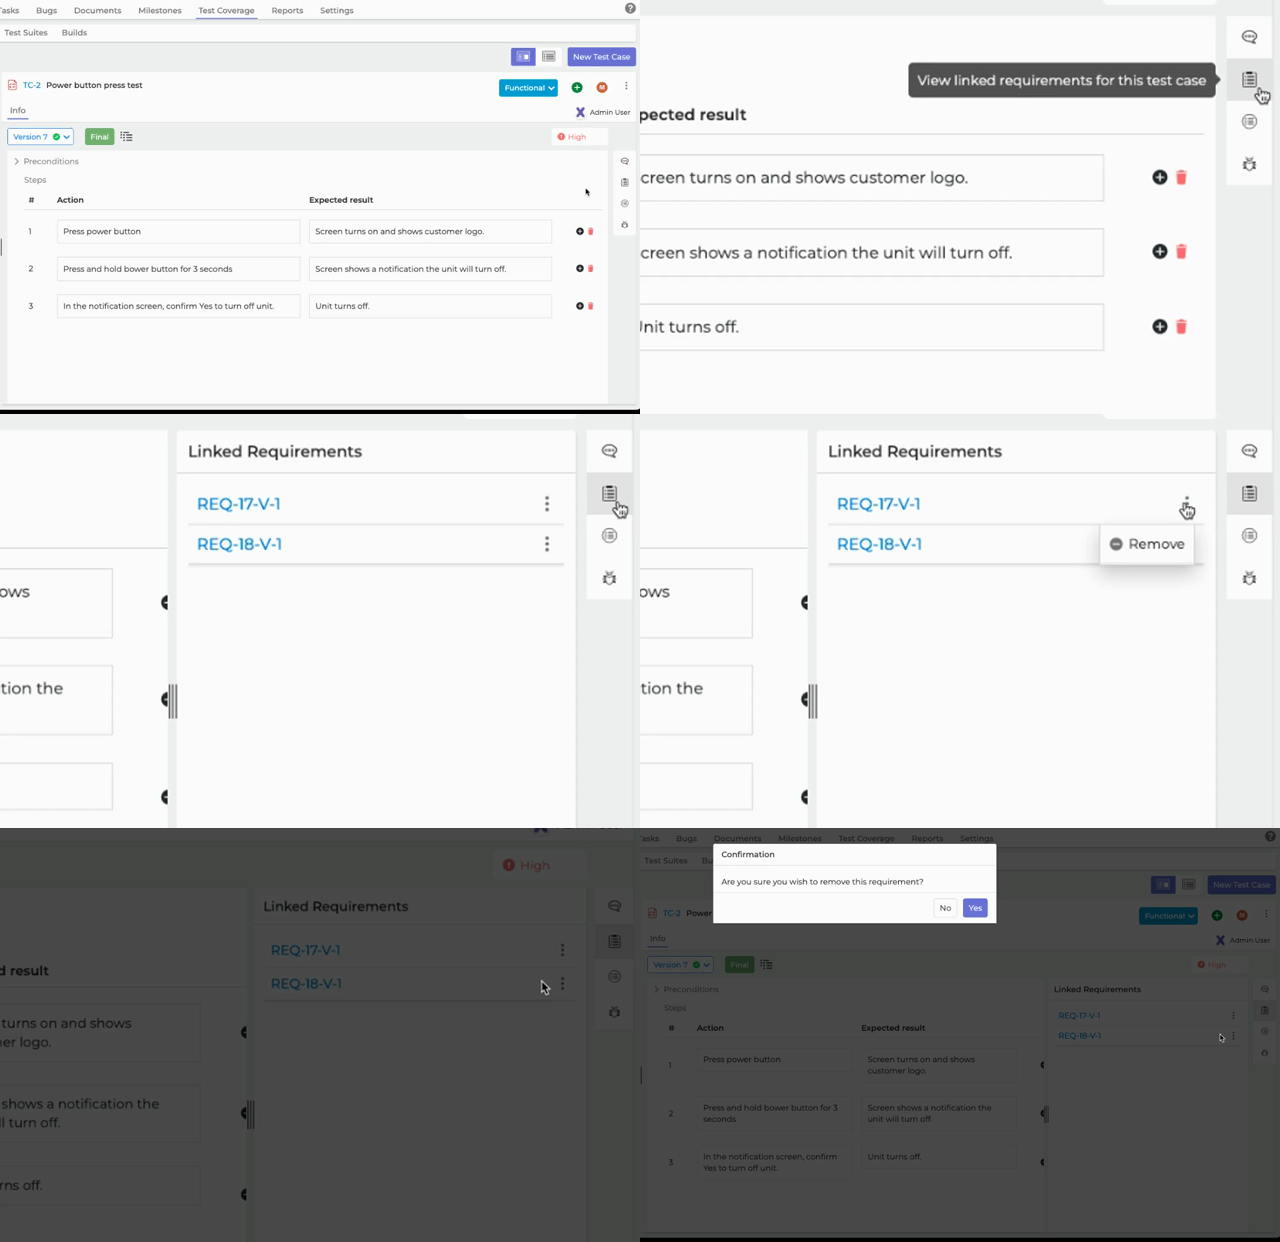
- Remove/Unlink requirements - To remove or unlink requirements to a test case version, click on the
 icon on the vertical menu on the left side. Then click on the menu icon
 for the specific requirement you want to unlink and choose
Remove.
- View linked test suites - To view the test suites linked to a test case version, click on the
 icon on the vertical menu on the left side. It will expand to show the list of test suites, if any are linked. Note that linking of a test case version to a test suite can be done in the project's Test Suites sub tab under the Test Coverage main tab.
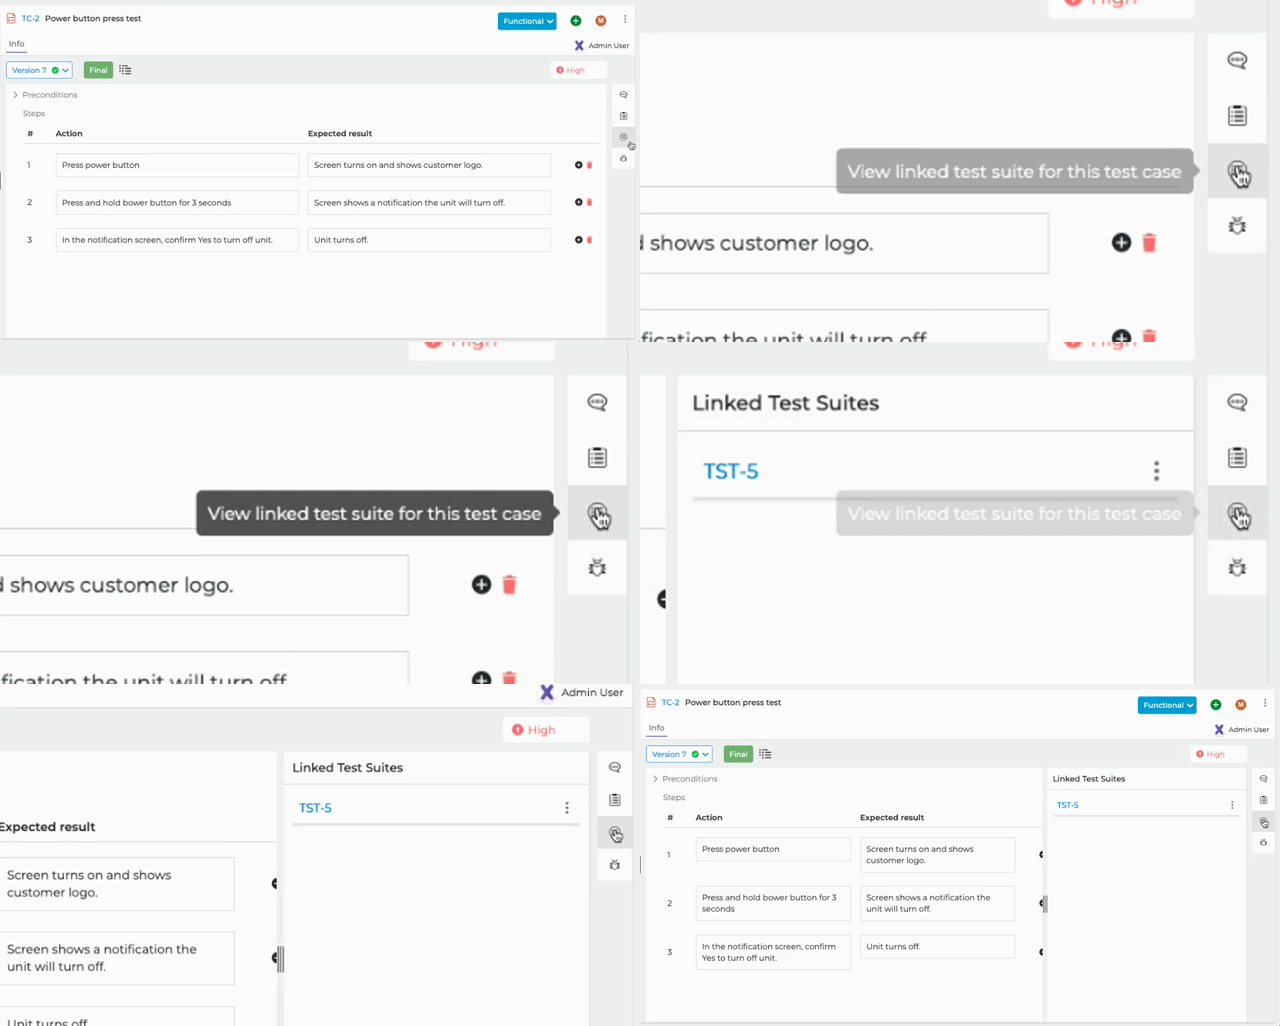
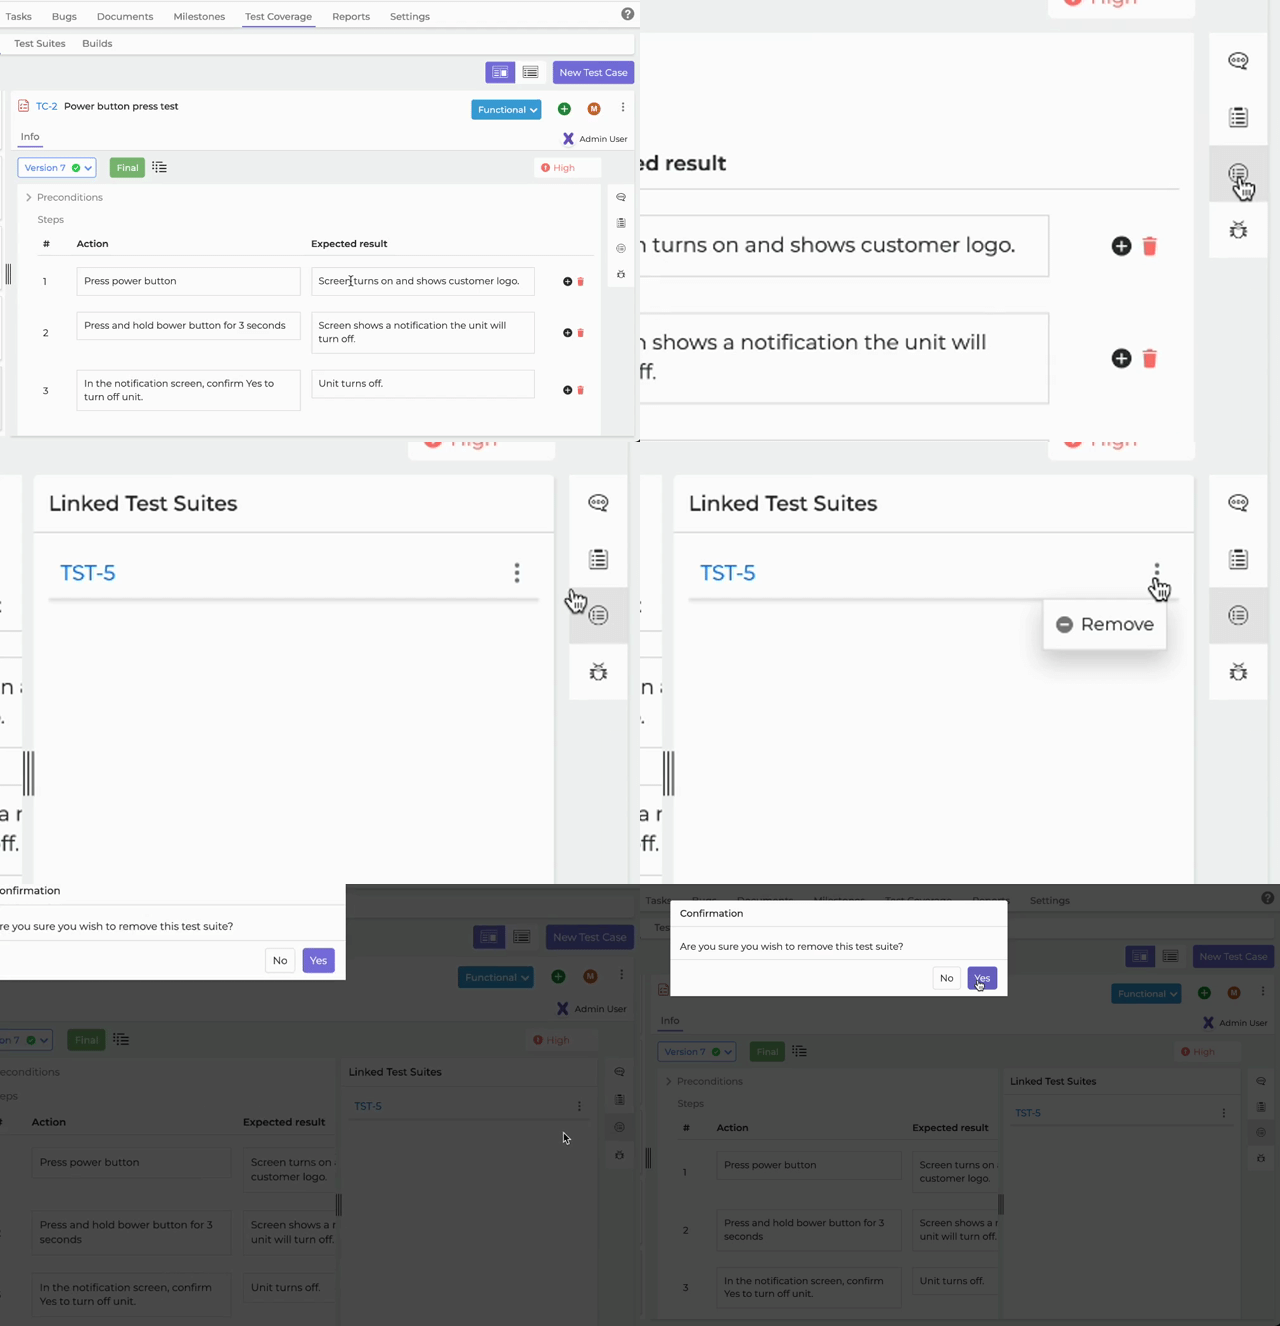
- Remove/Unlink test suite - To remove or unlink test suites to a test case version, click on the
 icon on the vertical menu on the left side. Then click on the menu icon
 for the specific test suite you want to unlink and choose
Remove.
- View linked bugs - To view the bugs linked to a test case version, click on the
icon on the vertical menu on the left side. It will expand to show the list of bugs, if any are linked. Bugs are linked to test cases during the execution of the test case (i.e. during test sessions in the Builds tab).
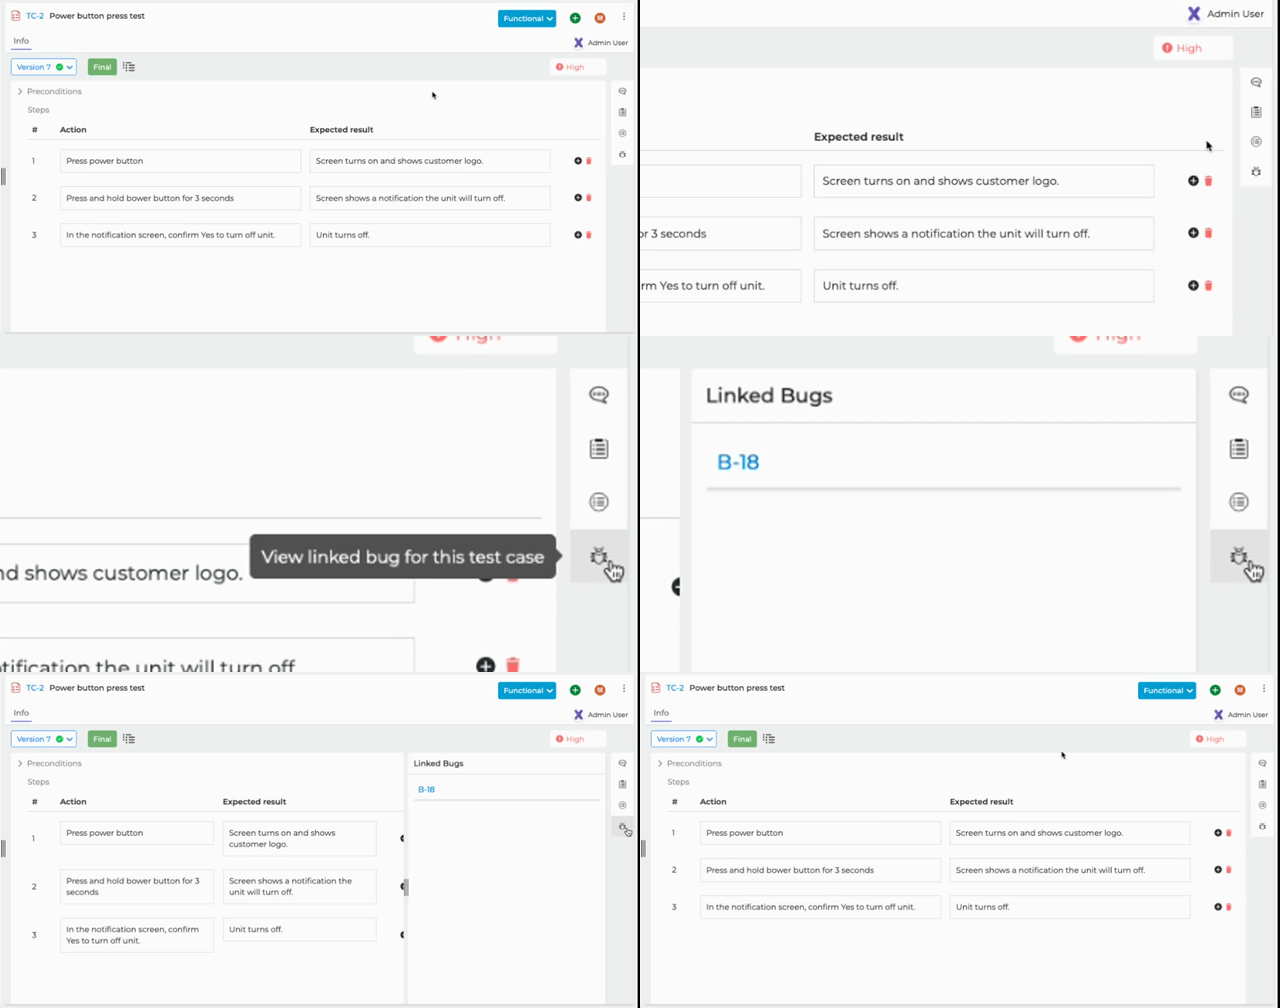
- Remove linked bugs - There is no option to remove a linked bug to a test case version. However, if the bug is deleted then it will no longer appear in the list of linked bugs for that test case version.
Comments
Please sign in to leave a comment.