The Documents module allows teams to create, organize, and collaborate on all project documents in one place. You can create documents, project wikis, schedules, client documents, road maps, OKRs, training/on-boarding guides, and everything else your team will need to collaborate.
PERMISSIONS: Users will need permissions to the Documents module to utilize the features in this article. Depending on the settings of a user's project permissions, they may be able to see all files or a subset of them. The content a user can view and the type of access the have may vary between project members. Project owners manage permissions of project members.
Document Help Highlights
View or add shared members to a file or document
Views
There are two views available in the Documents tab:
 Grid View
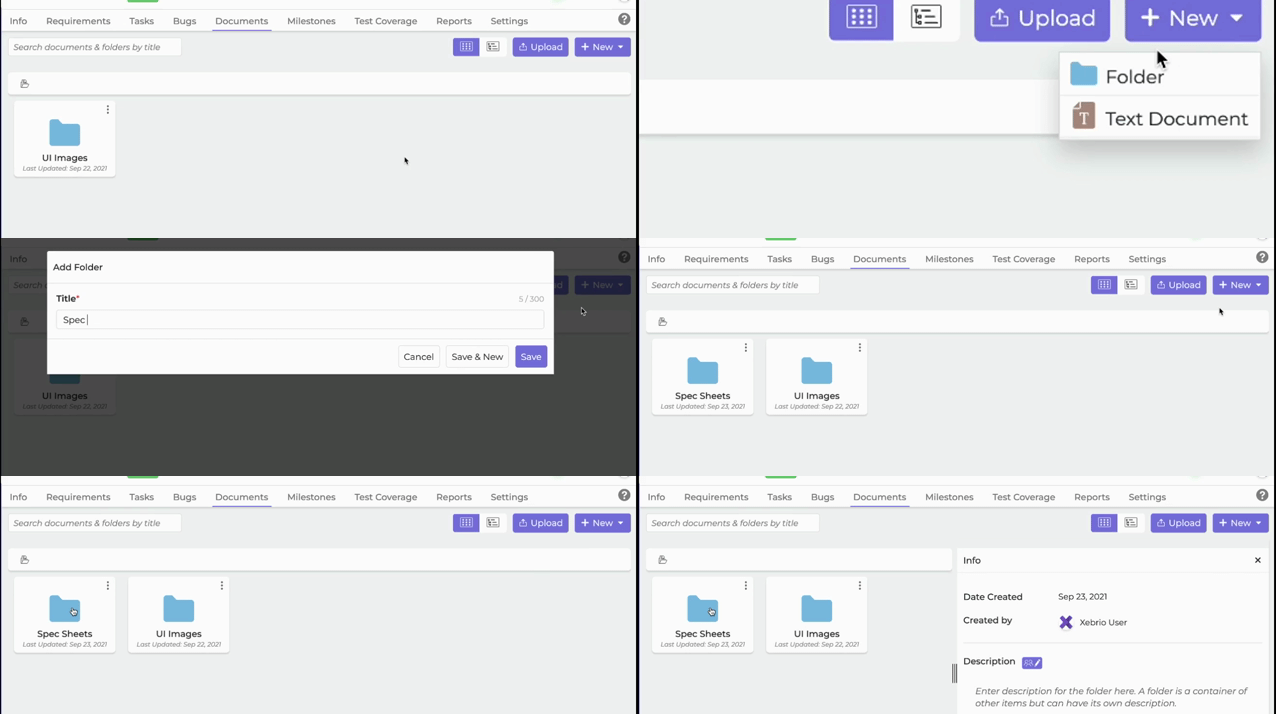
View of the thumbnails for the documents and folders. Shows the current folder whose contents are shown in the view.

 Tree View
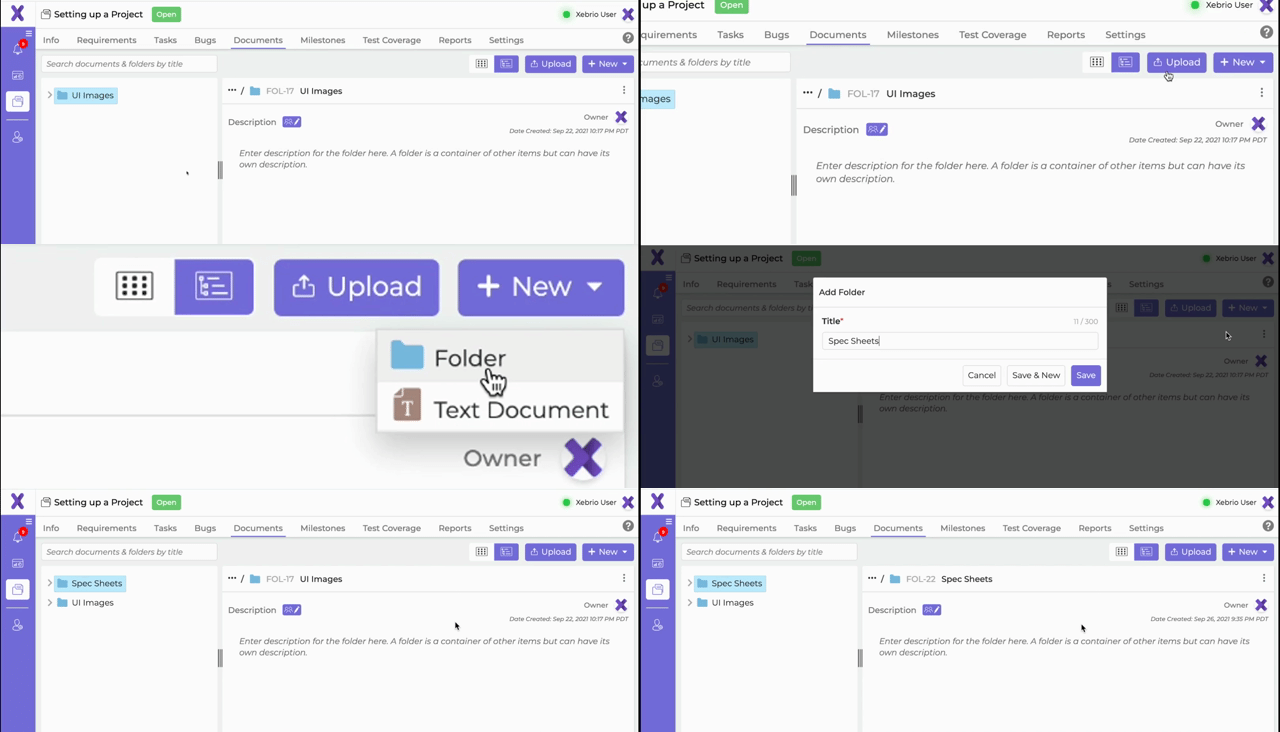
Shows the hierarchical document tree with the top-level items showing first. You will be able to expand/collapse folders.

Sharing Modes
There are three types of sharing modes available in the Documents tab.
Private - Documents and files are private by default upon creation or upload. They are only visible to the user who created or uploaded it.
Public - By making a document or file public, it is made available to internal and client project members. Public items will not have the option to Share with members since it is available for viewing by project members.
 Sharing with specific project members - By selecting Share option, a popup with potential members will be shown. This popup lists active project members whom you can add and share the document or file.
Changing the sharing modes will be covered later in this article. Skip to Mark Private or Public or Share with other users where this is covered.
Adding Content
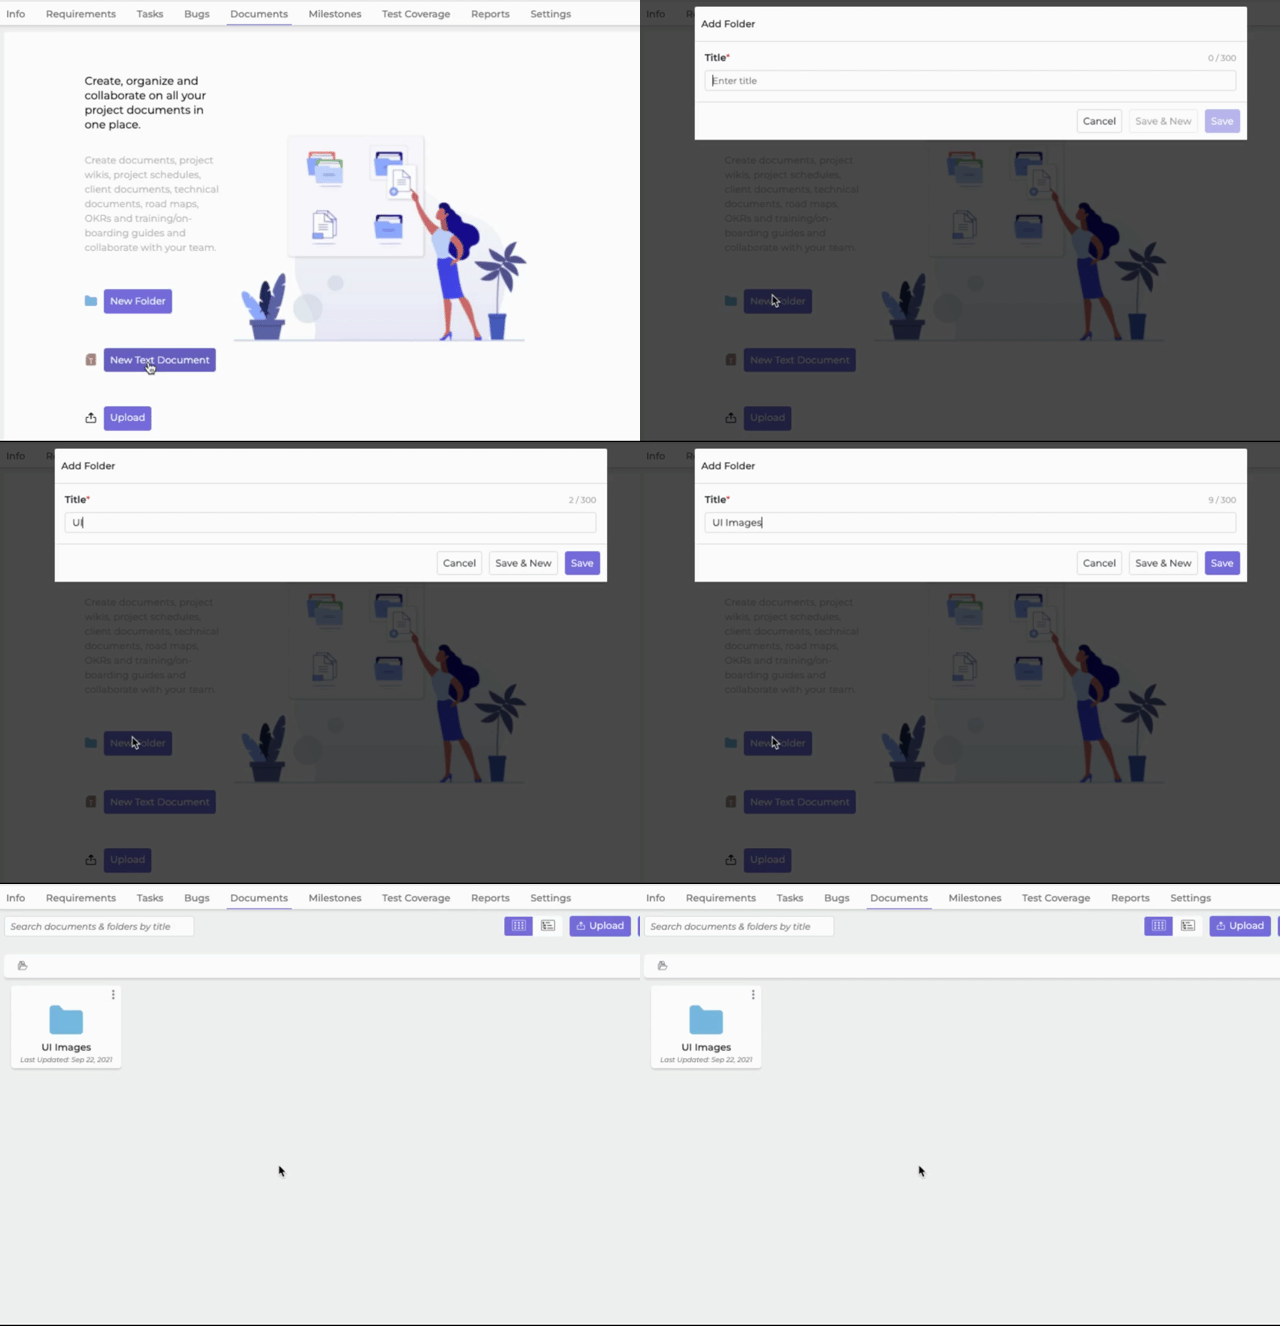
When the Documents folder is empty initially, you will see an introduction screen where you will have options to add a new folder, text document, or upload files.
Adding Folders
When no content is added to the Documents tab, click on the New Folder button. When content is already present, click on the + New button on the top right corner and choose Folder from the drop down. A pop up will appear to where you will be prompted to add a title for your new folder. Click Save to finalize, or Save & New to save the folder and immediately create another folder.
Clicking on the folder will show you the details of the folder on the right side of the window. Here you can collaborate on the folder description, view date the folder was created and who created it.
In tree view, you may right click on a folder and choose New Folder to add a folder directly to the folder.
Grid View
Tree View
Adding Documents
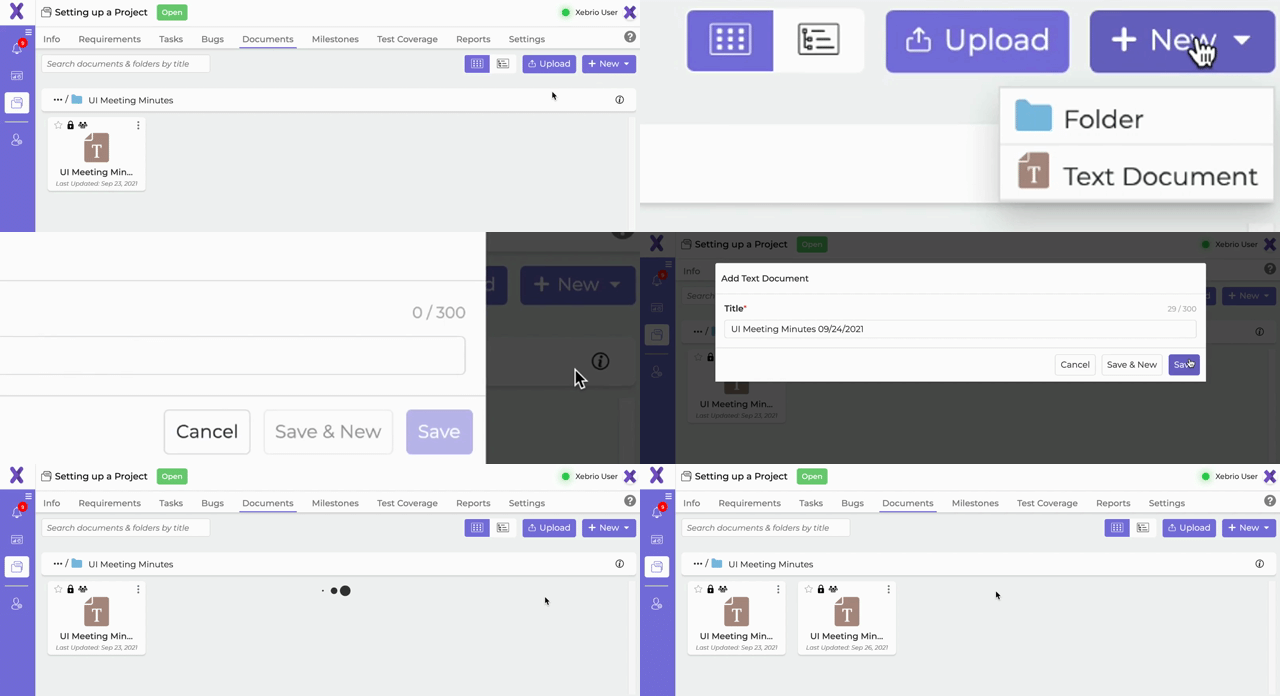
When no content is added to the Documents tab, click on the New Text Document button. When content is already present, click on the + New button on the top right corner and choose Text Document from the drop down. A pop up will appear to where you will be prompted to add a title for your new text document. Click Save to finalize, or Save & New to save the document and immediately create another document.
Double clicking on the text document in grid view will open the details of the document. In tree view, the details will show in the window upon creation. In the details section, you can collaborate on the text of the document.
In tree view, you may right click on a folder and choose New Text Document to add a document directly to that folder.
Grid View
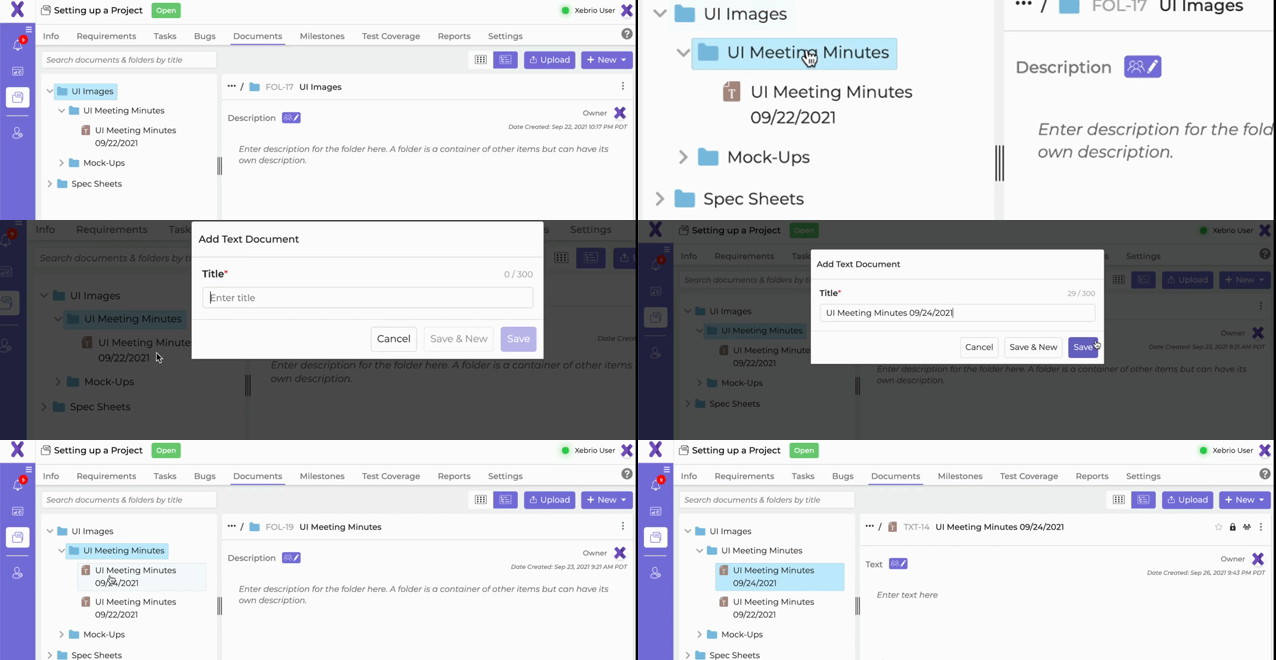
Tree View
Upload Files
You may upload files to the Documents tab. Click the Upload button and choose a file from the pop-up. In tree view, you may right click on a folder and choose Upload to add a file directly to that folder.
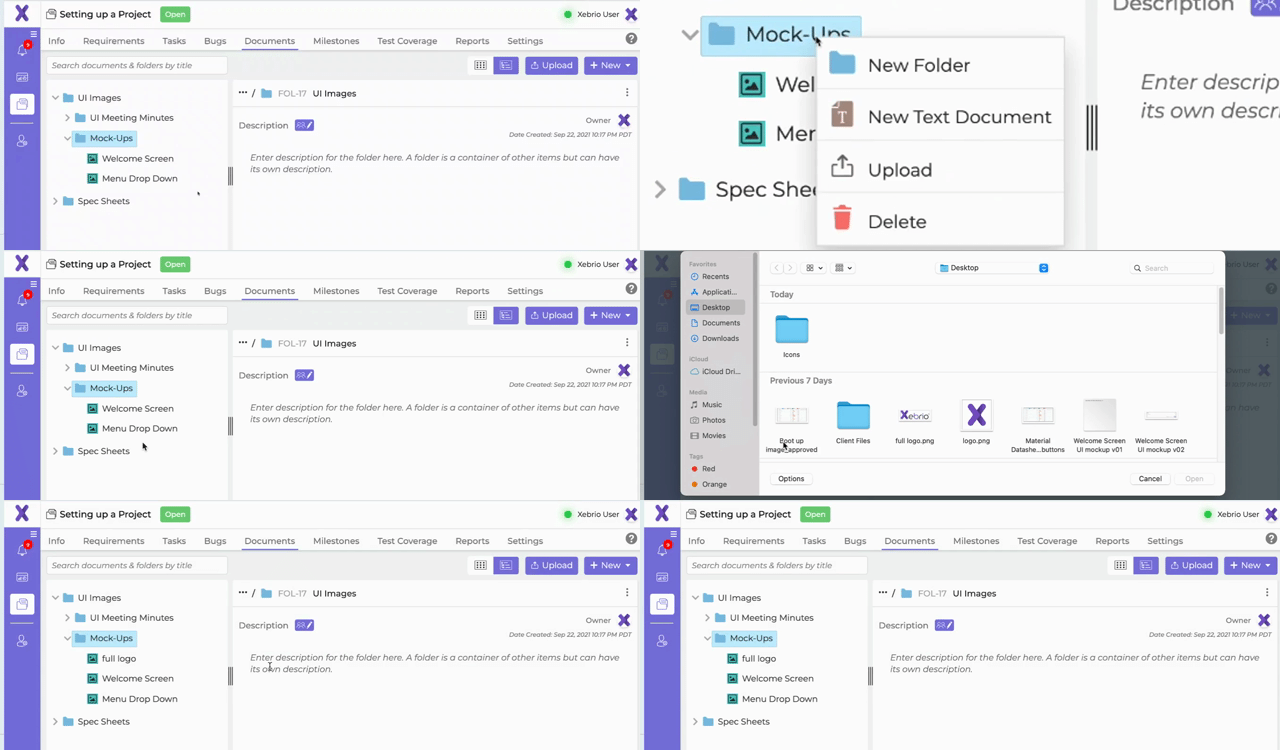
The following files are supported for upload:
- .doc
- .docx
- .txt
- .png
- .jpeg
- .key
- .numbers
- .xls
- .xlsx
- .ppt
- .pptx
- .pages
- .rtf
- .mov
- .mpeg
- .zip
- .mp3
Re-arrange content
In the tree view, you may move any text document to any other location in the tree and into any other folder. It cannot be moved on to another text document or on self.
Any folder can also be moved to any other location in the tree and into any other folder. It cannot be dropped on itself.
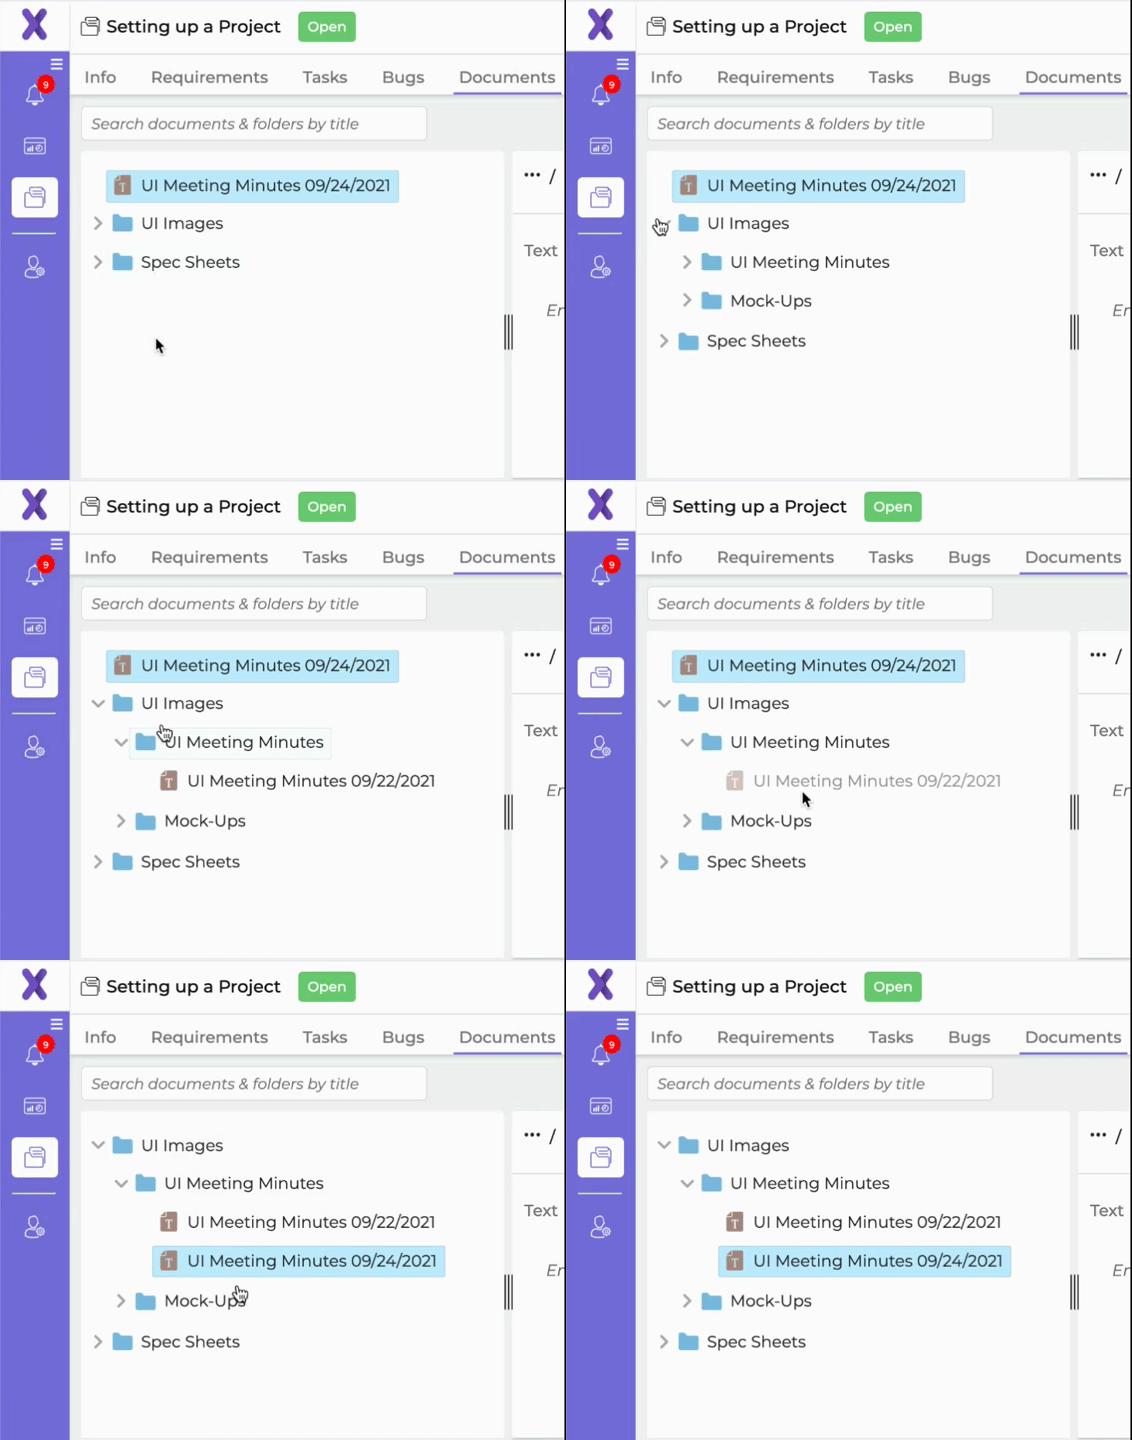
Delete content
A file may be deleted, and a folder may be deleted if it has no items in it. In the tree or grid view, click on the vertical menu icon for the file or folder. Choose
Delete in the dropdown and confirm the deletion. Alternately in the tree view, you may right click on the file or folder and choose
Delete .
Note that when a file or folder is deleted, it is permanent and can not be recovered.

Delete from Menu
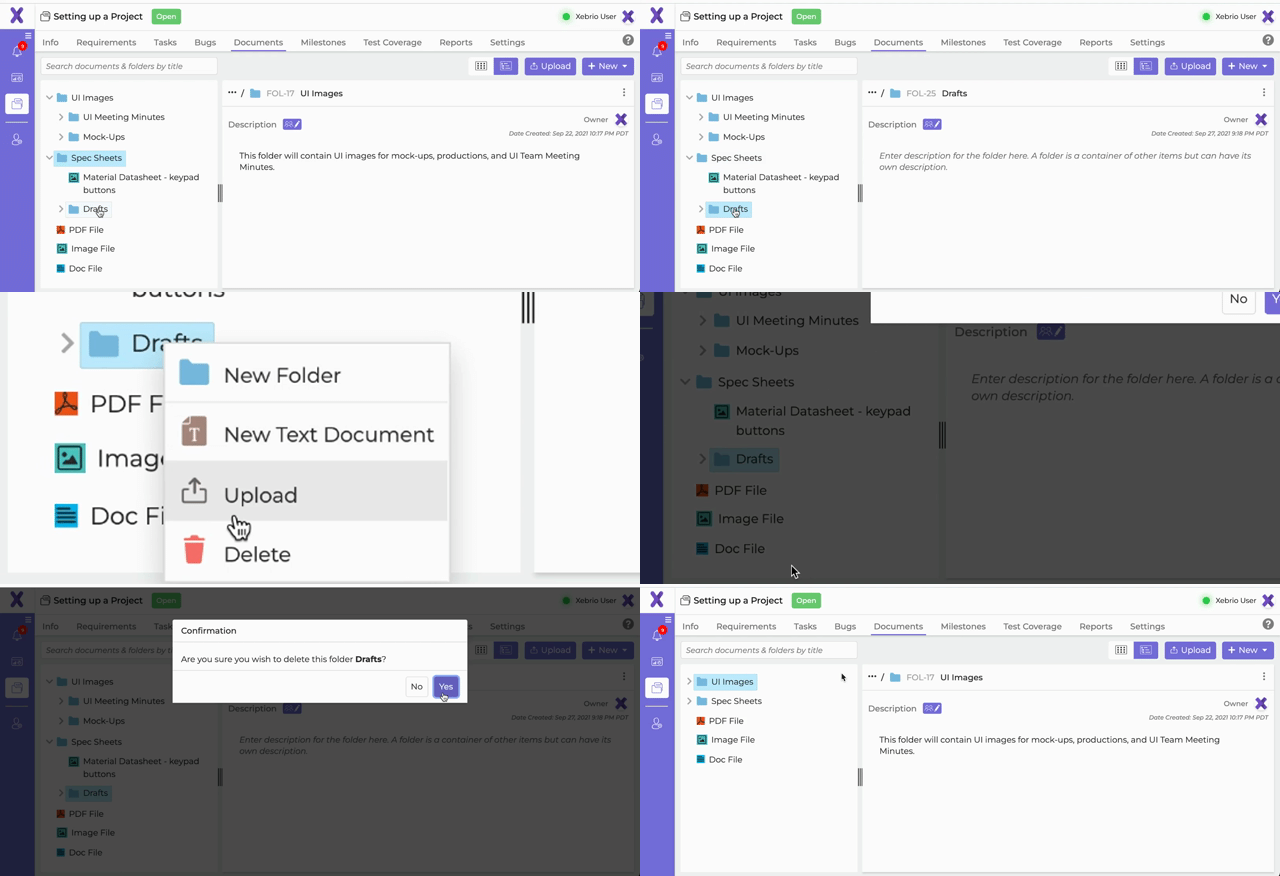
Delete from Tree View
Mark Private or Public
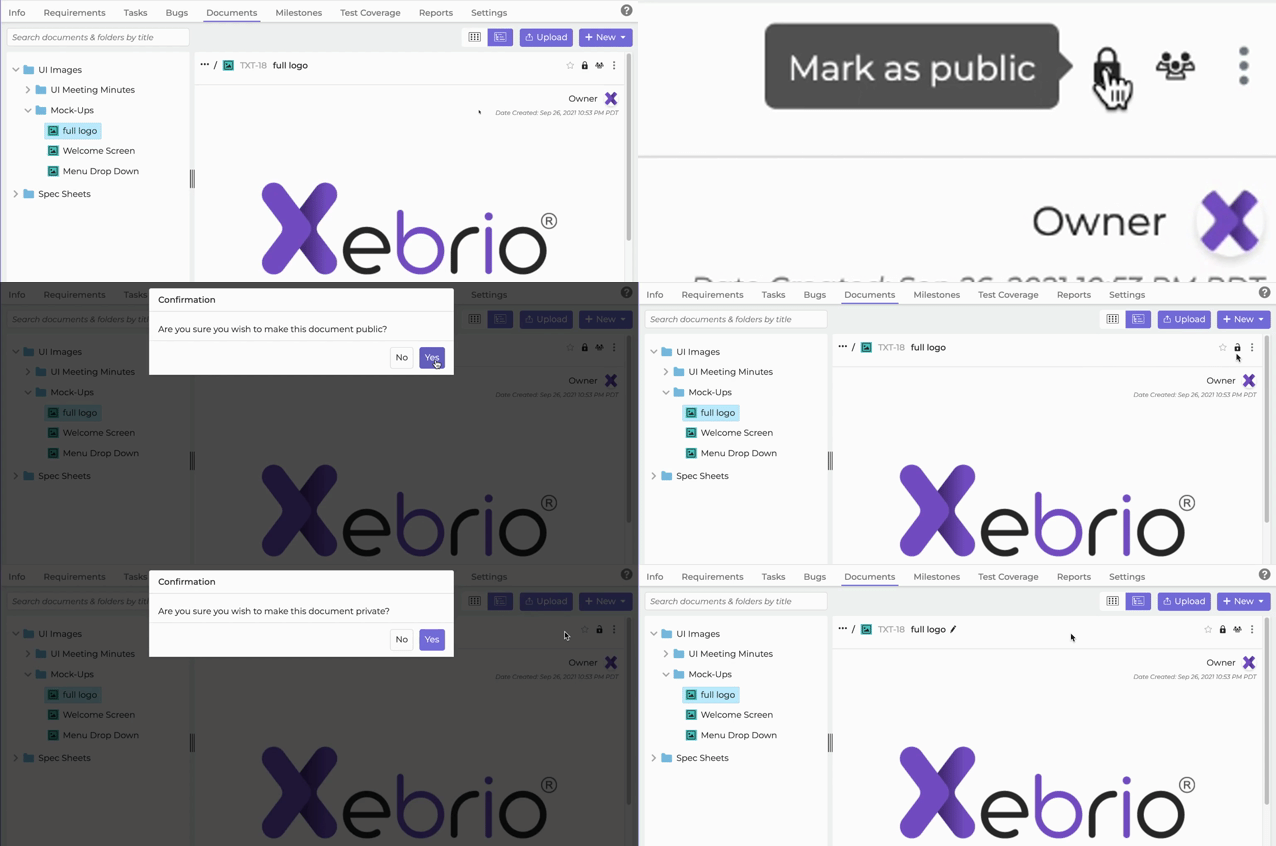
By default, files and documents are private to the user who created or uploaded it. To change an item from private to public, click on the lock icon and confirm in the pop up to change it to public
. This will make the document or file available to internal and client project members. Public items will not have the option to Share with members since it is already available for viewing by project members.
View or add shared members to a file or document
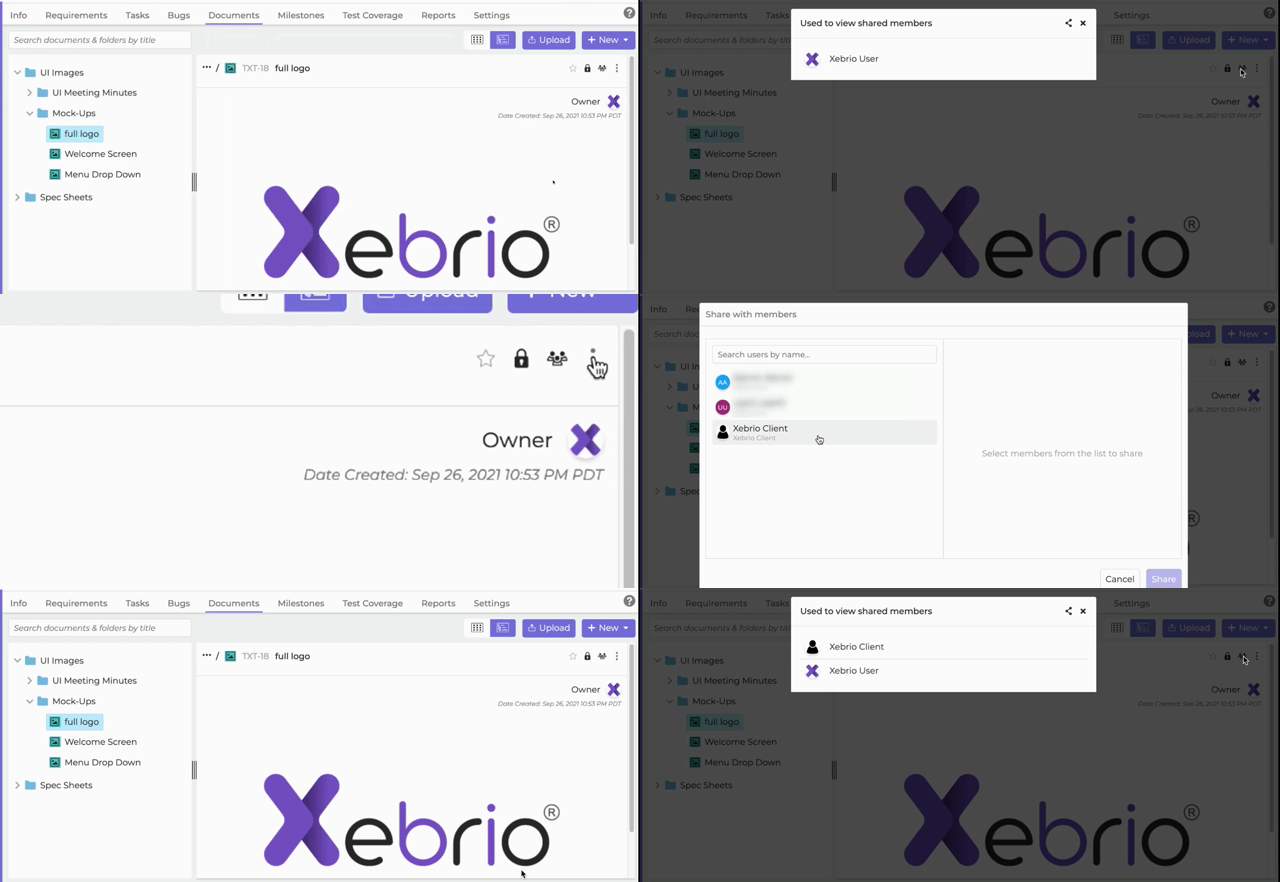
You may share a document or file with another project member. In the tree or grid view, click on the vertical menu icon for the file or folder and choose
![]() Share. A popup with potential members will be shown. This popup lists active project members whom you can add and share the document or file.
Share. A popup with potential members will be shown. This popup lists active project members whom you can add and share the document or file.
To view the project members that a file or document is shared with, click on the icon and a pop-up will appear with the list. From this pop-up, you may also kick on the
![]() icon to share.
icon to share.
Remove a Shared Member
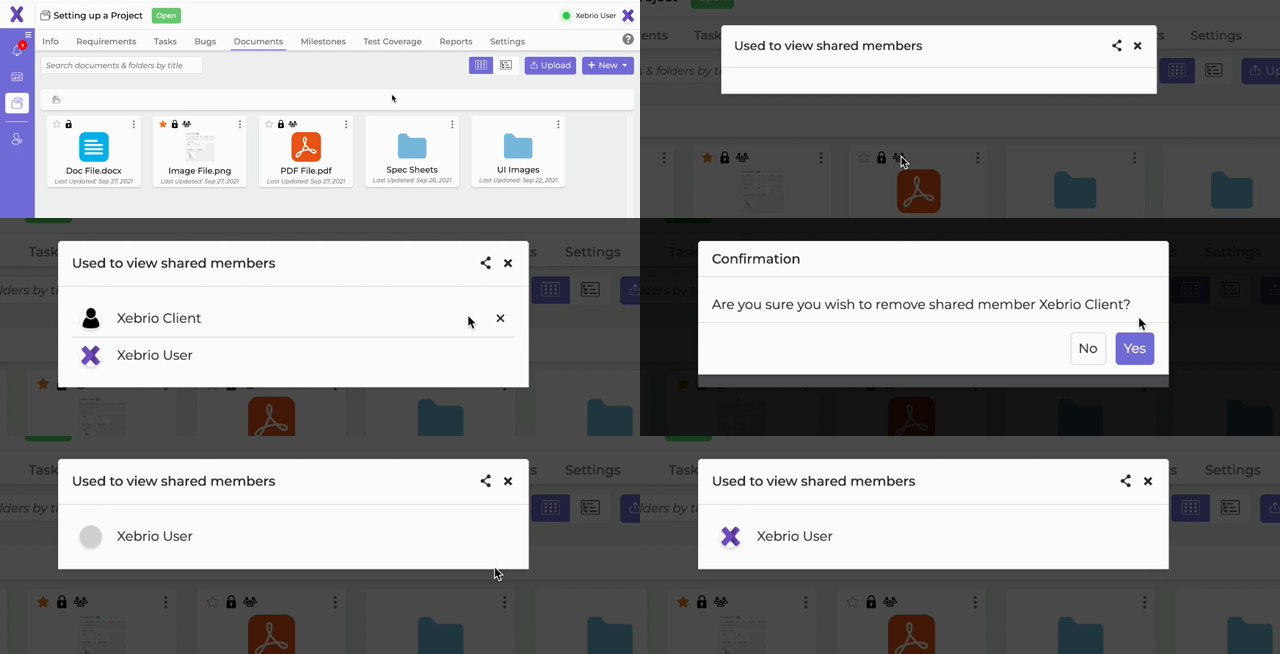
To remove a member from viewing a private file, click on the icon and a pop-up will appear with the list of shared members. Hover over the name of the user you wish to remove until a
appears. Click on the
to remove the user.
Note that the user who created or uploaded the file will not be able to be removed from the list of shared members.
Navigation breadcrumbs
Navigation breadcrumbs will appear when clicking on the ![]() . The drop down will show the root level plus the level onwards below it. Clicking on a level will redirect you to that folder.
. The drop down will show the root level plus the level onwards below it. Clicking on a level will redirect you to that folder.
The root level is ![]() Documents, and will show a
Documents, and will show a ![]() icon when you are in this folder rather than the
icon when you are in this folder rather than the ![]() icon.
icon.

Breadcrumb example next to Tree View structure
Comments
Please sign in to leave a comment.